Thursday, May 2, 2019
During a jumping session (mobile obstacle or cross-country), the CEEFIT (alone or with the CEEFIT Pulse & ECG) provides you with valuable information. This information will help you achieve the best progress to the obstacle. Combined with sensations and the rider's impressions coach's impressions, this data helps organize and analyze training sessions. With this in mind, here are a few keys to understanding and and use jumping indicators in jumping work.
Heart rate, energy expenditure, time spent at each pace, average speed and distance covered. All this data tells you yourphysical intensity of your session, from your horse's point of view. For a jumping session, you'll have access to other information that will help you maintain your horse's health and fitness.
Firstly, the number and height of jumps performedectués in the session is a good indicator. When you're working on a mechanization device or a sequence, you often tend to lose count of the number of jumps. lose count.
And yet it's a very important factor to keep an eye on. Even when you don't jump very high. 30 or even 50 repeated landings will have a significant impact on the horse's musculoskeletal system. of the horse.
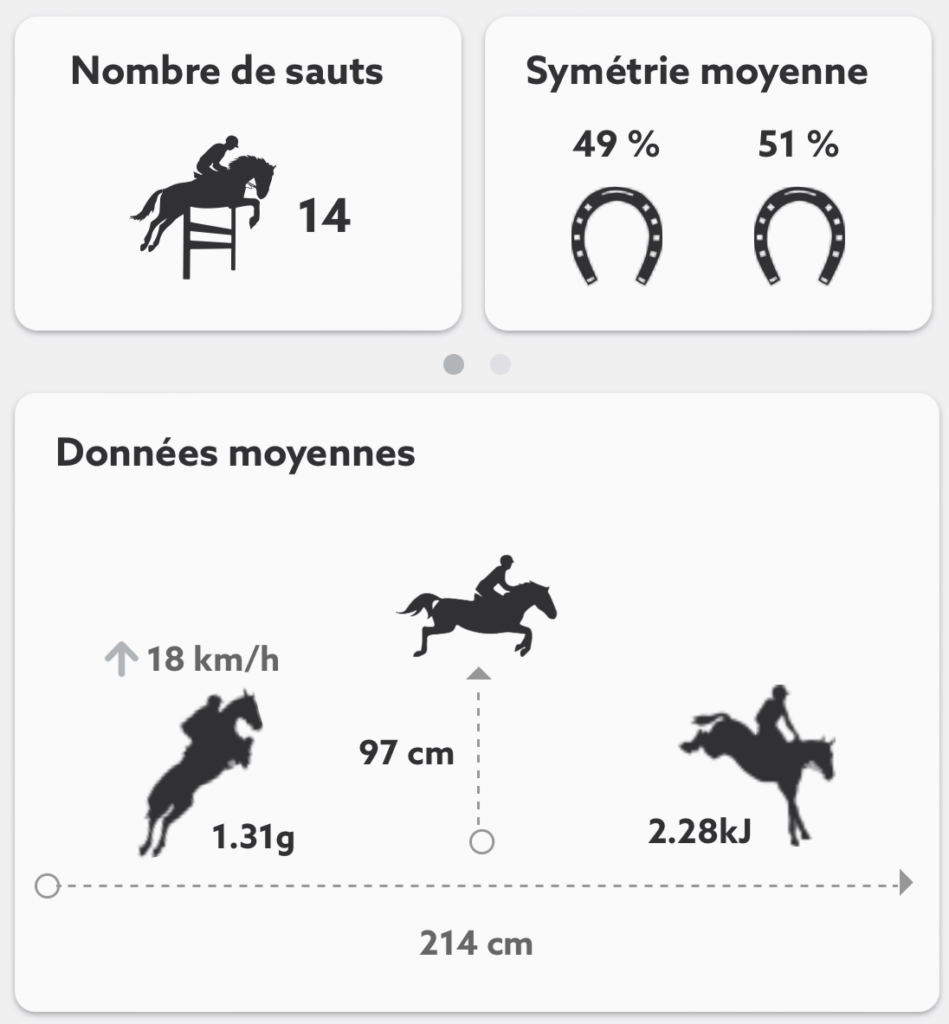
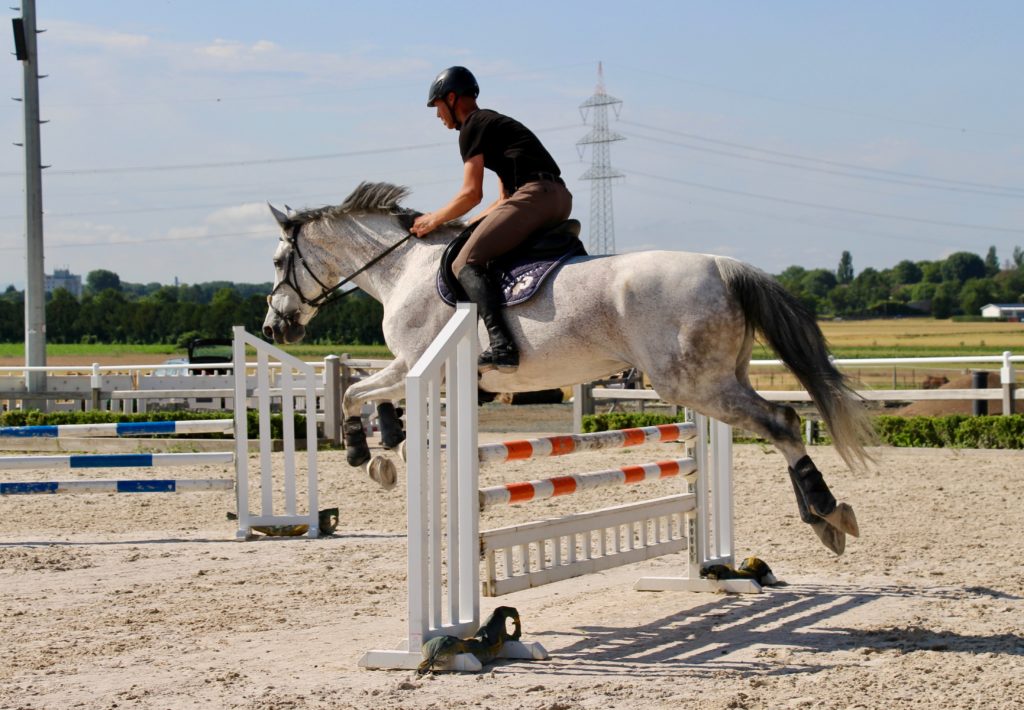
For example, in this illustration on the summary page, a session of 14 jumps at an average height of 97cm is a very moderate effort. very moderate effort. It's easy to imagine several sessions a week at this pace, as the horse has not been overtaxed.
We recommend limiting yourself to 50 jumps per session and 80 jumps per week. Of course, this advice depends on the height of the obstacles. Between cavalettis and 1.60 m obstacles, there's plenty of room for improvement!
The purpose of these measurements is to quantify the effort by the horse. Jump height is not, of course, the only relevant datum, but it does give an indication of the energy required by the horse to rise and clear the proposed bar, and (as the rider generally knows at least approximately the height of the obstacle) it enables us to the horse's tendencies.
Sometimes, riders can be fooled by sensations of power and speed, and overestimate the jump height of an energetic horse with a good kick, or underestimate that of a less tense horse. The sensor makes it possible to objectively quantify which the rider would otherwise only have access to via video analysis with prior calibration.
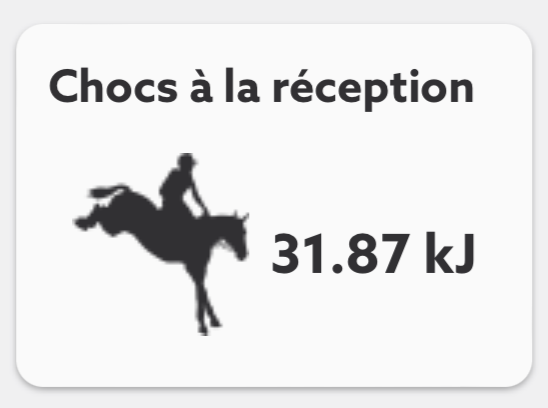
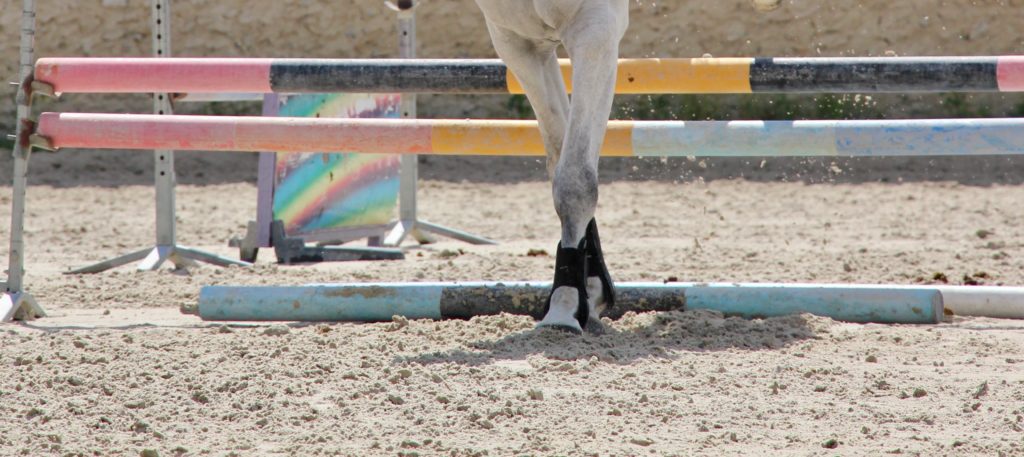
This is why Seaver also quantifies the total energy of landing shocks. It's an additional piece of data that gives you an idea of the effort absorbed by your horse's limbs (mainly the front legs). At the end of each jump, part of the mechanical energy generated by the movement is conserved and re-employed in the forward movement. But some is dissipated both by the ground and by the equine equine damping system.
Thus, the spread of the heels, the sinking of the3rd phalanx into the plantar pad and the extension of the foreleg tendons will help cushion your weight and that of your horse. Of course, the ground quality plays a major role in reducing the forces at play; that's why surfaces that are overly hard surfaces or on the contrary too deepor unevenare to be avoided.
The higher and harder your horse jumps, the more vertical the landing and the greater the shock absorbed. However, the obviously vary according to the horse and thel, and the characteristics of each jump.
The average over the session provides an indication of the stress imposed on the locomotor system.. In a classic session, for example, we aim to stay below 70kJ in total. On courses of 12-15 obstacles at heights of over 130cm, this value will frequently be exceeded. This is not a serious problem; you simply need to be aware of the intensity of the exercise. Adapt the grounds and care and try not to repeat these demanding efforts too closely together. This will enable you to preserve the athlete's physical of the athlete.
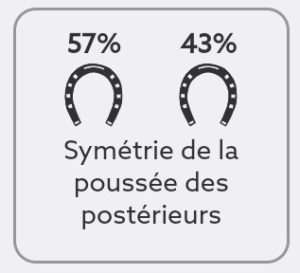
The symmetry of the hind leg thrust provides information on the health of the jumping horse's musculoskeletal system. This score reflects the left/right symmetry of propulsion. In other words, it analyzes how your horse uses his back and hindquarters to push himself over the obstacle. For a perfect horse, on each jump the note should be 50% I 50% for the 2 hindlegs. This means that the horse exerts the same force on each of its limbs at the moment of the call.. He then rises straight along his axis.
However, it's not uncommon to get a lower score on certain jumps during the session. Don't let this worry you. This is the case, for example, when a horse is worried about a new obstacle or a piece of scenery. He will then abruptly change trajectory as he approaches it. Or in the case of a wrong place. In this situation, it won't always be the same hind leg that's "weak". That is, the one with the lowest percentageFor example, the right hind leg in the illustration above.

On the overall score, the further away from perfect 50/50, the more asymmetrical the horse. Below 5% average difference (over 10 jumps or more), you need to start watching carefully. Especially if the horse was previously symmetrical! If this result is repeated over several successive sessions, it may be worth seeking the advice of an osteopath or veterinarian.
An asymmetrical asymmetrical thrust may indicate discomfort or pain in a hind leg or back. It can also be the result of a problem in a front leg or shoulder. As the horse anticipates and seeks to reduce the pain to come on landing. Detecting this type of problem as early as possible generally means better treatment. And, if necessary, faster recovery. The more the horse jumps and functions in its asymmetry, the greater the risk of aggravating the problem. He may also want to compensate, and so run the risk of creating further lesions.
In addition to the health aspect, jump indicators also provide more technical information on the jumps made. By detailing the data specific to each jump, and associating it with the profile of the obstacle jumped, it's easy to analyse the situation and improve future jumps.to analyze the situation and improve future jumps.
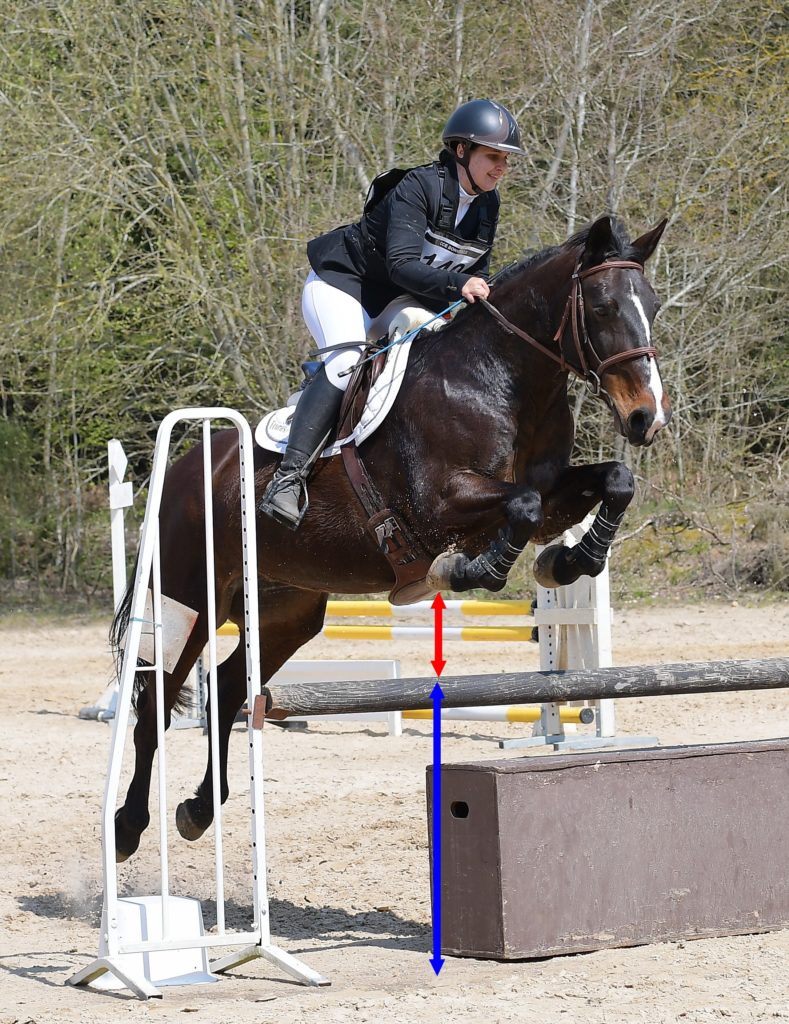
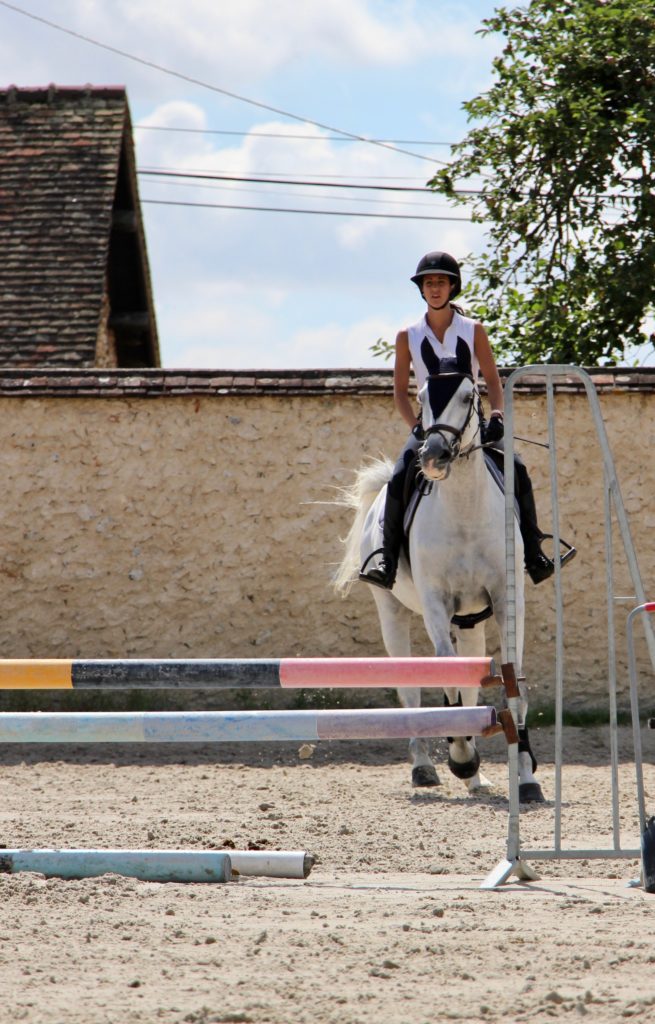
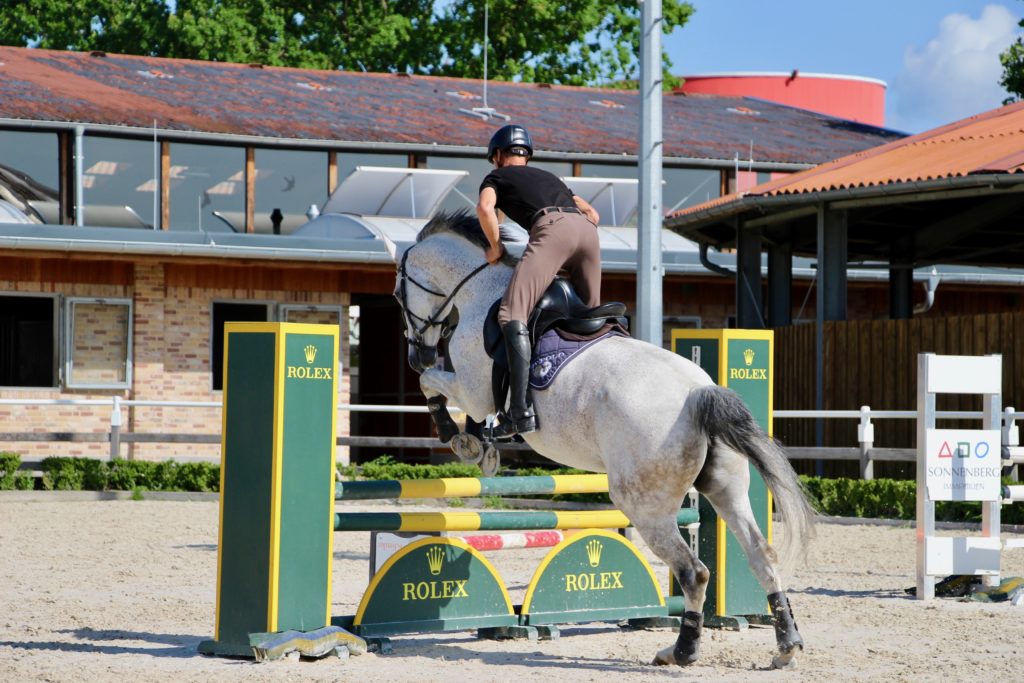
First of all, bear in mind that the sensor does not detect the obstacle crossed. The height indicated for each jump corresponds to the maximum height at which the sensor (i.e. the horse's sternum) during the jump. Depending on the horse and the obstacle profile, this height is 20 to 50cm higher than the actual height of the obstacle jumped. And that's even taking into account the space occupied by the forelegs and the margin left.
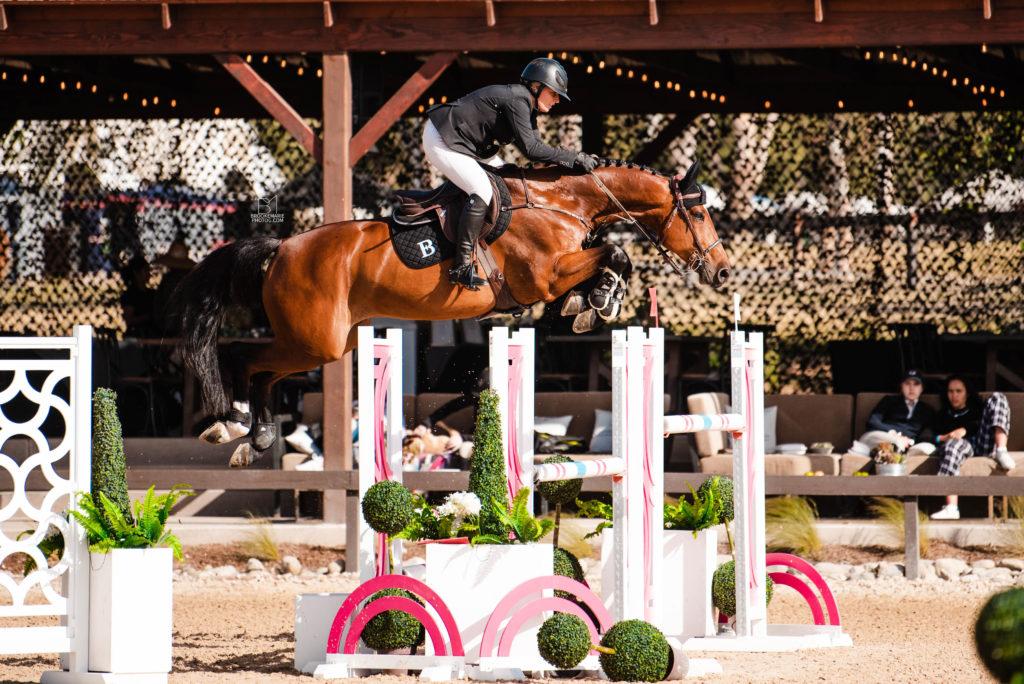
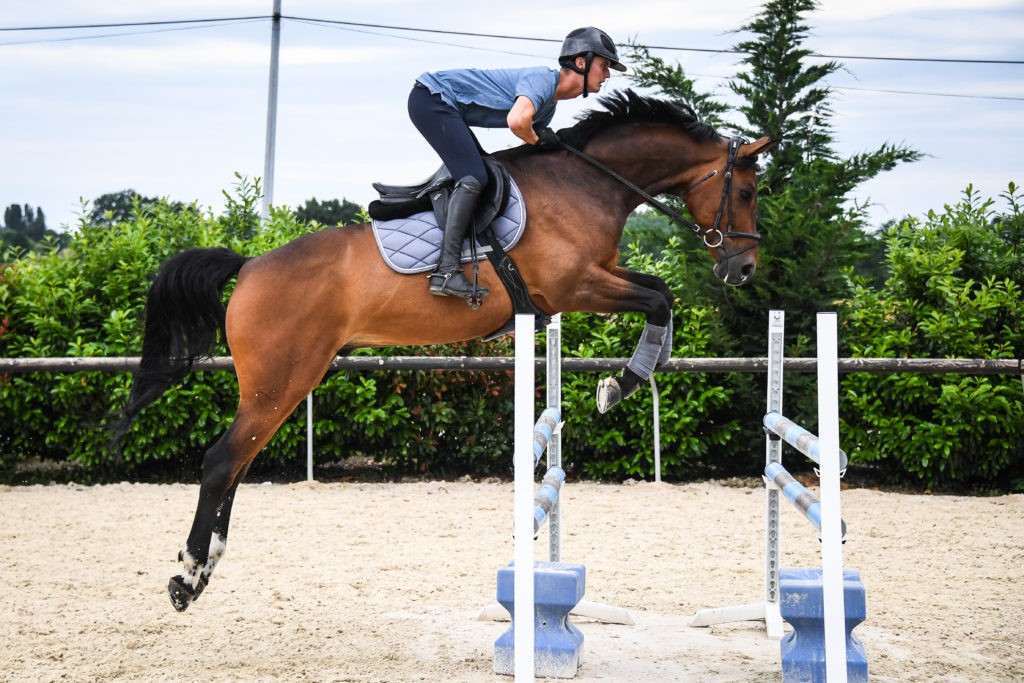
For a young horse, or a very demonstrative animal, the margin can be much higher. This is also the case for holes or unbarred rivers, for example. In the photo opposite, for a bar at 95cm (in blue), the height detected will be around 120cm, as the added margin (in red) is close to 25cm. This doesn't mean that the horse cleared 120cm with its limbs. Indeed, his limbs were probably hanging a little lower. But he did cross them with his sternum. To find out more, read our article on jump height functionality.
For horses with a tendency to shift their trajectory (forwards or backwards), a fault can be committed even though the height of the jump is greater than that of the obstacle. This is the case for horses still in the ascent phase or already in the descent phase above the bar. The top of the trajectory is no longer above the obstacle, or if he leaves one foot dragging. For these situations, the rider's feeling, the coach's eye and possibly video assistance will be necessary. For all others, Seaver data comes to the rescue!
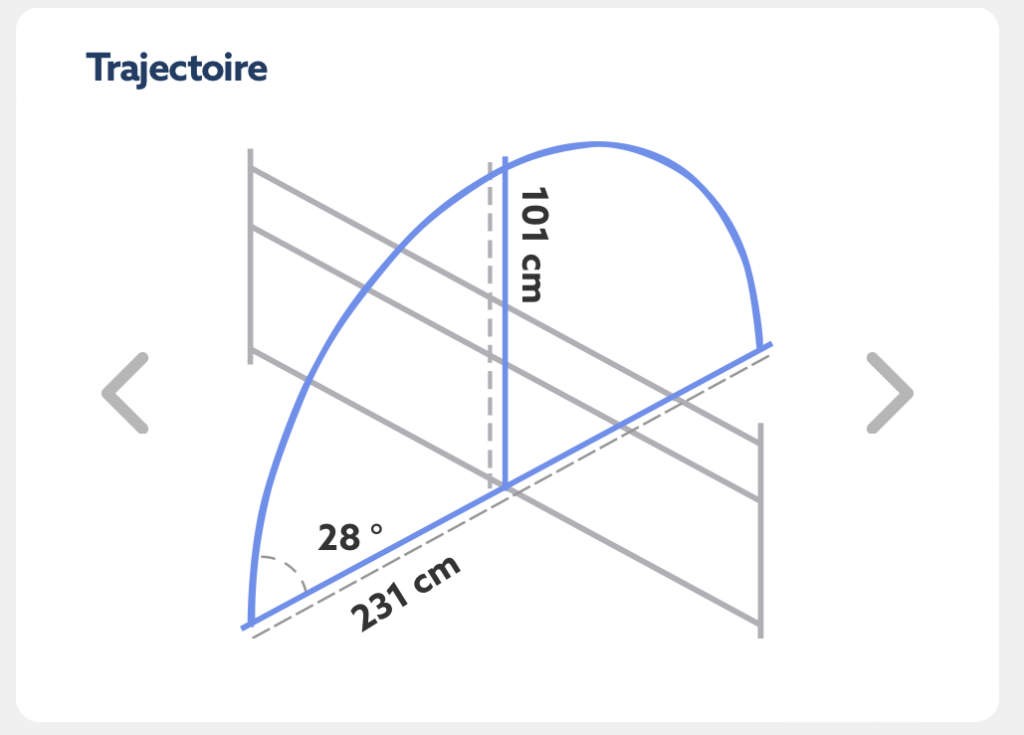
The first feature to be analyzed jump by jump is jump trajectory: height, reach and angle of attack. For an oxer or a volée jump, the angle of attack will be smaller than for a vertical of corresponding height, and the reach will be greater. Indeed, on a vertical, the horse will have to cover less ground than on an oxer (because the oxer is wider).
This distance from the ground gives you a better view of your horse's trajectory, so that you can adapt it to the best of your ability and feel more at ease in combinations and other lines.
Of course, there's no such thing as a perfect value: it all depends on the obstacles you've jumped and what you want to achieve.
The angle measures the horse's verticality at the moment of take-off. The greater the angle, the higher the horse rises. The smaller the angle, the more the horse throws itself forward. For example, if a horse is slow in the forelegs and needs to be given room in front, we'll try to favour large angles. For a small angle, you'll need to take off further from the first vertical plane to clear the same height without fault. Reach is very useful to analyze in a line or combination. In addition to the amplitude of the strides between the obstacles, the place of the landing of the first element is fundamental in respecting a stride contract. An error in front on the second element of a double can sometimes be explained by a jump that is too "flat" on the first.
The striking force reflects the horse's reactivity and the power he develops in the jump. Of course, the higher the obstacle, the greater the strike should be. It is also greater on a vertical jump than on a long jump. The higher the obstacle, the greater the force applied.
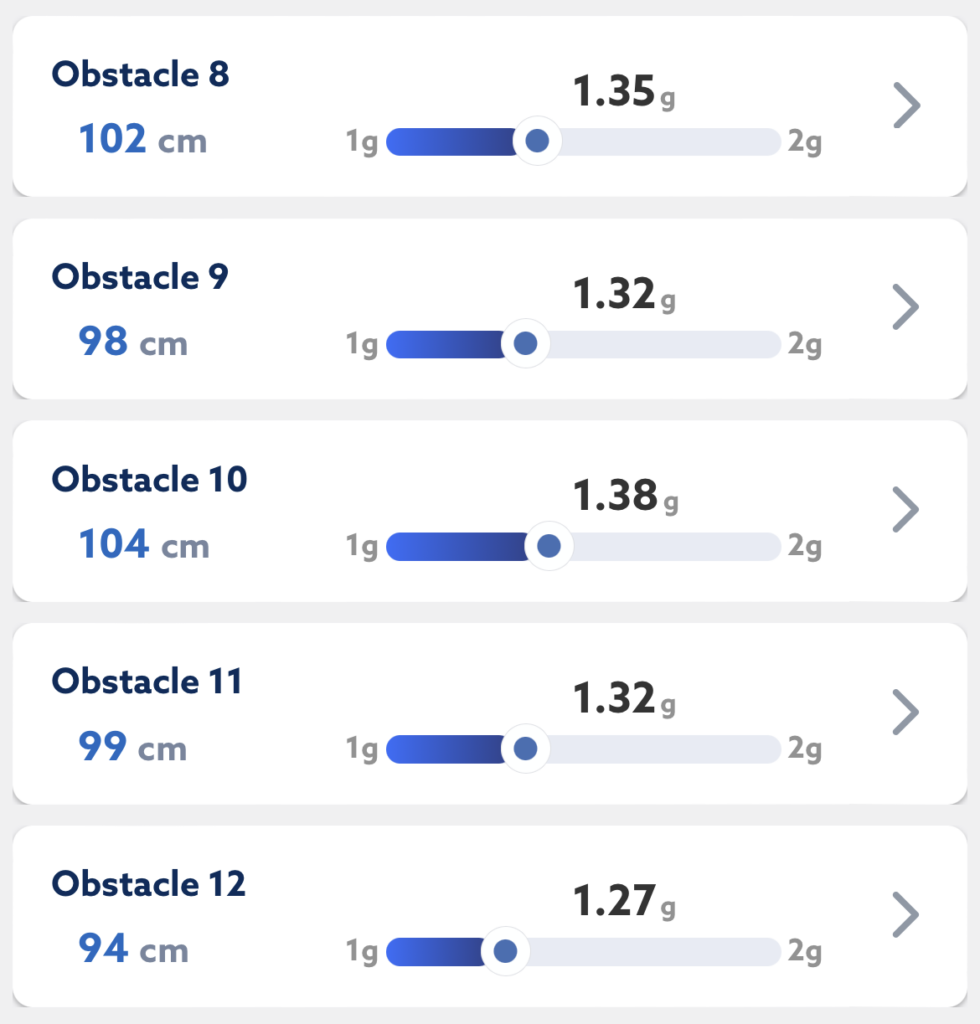
We express the stroke in g ("ge"). This is the vertical acceleration of the horse at the start of the upward phase of the jump. 1g corresponds to the earth's average gravity (9.81m/s² ). A horse's strike is normally between 1g and 2g.
More than the value itself, it's its evolution that should interest you. For the same horse and the same obstacle, a higher strike indicates a diligent horse. In this case, the horse may be investing too much effort. He does more than is necessary, and increases his risk of injury. On the other hand, a horse with a lower strike may be tired, or suffering from a loss of form. It could also be a lazy horse that needs to be motivated to work harder on its obstacles.
Upward speed is the horse's the vertical speed of the horse during the upward phase of the jump. It's not his speed on the ground before jumping, but his speed in the air, and only upwards. This is generally understood to be between 10 and 20km/h. In some horses, it can reach 30km/h. It's a good indicator of the horse's reactivity, but also invaluable for dams. This is an objective indicator of the well-known phenomenon of the horse "wasting time in the air".
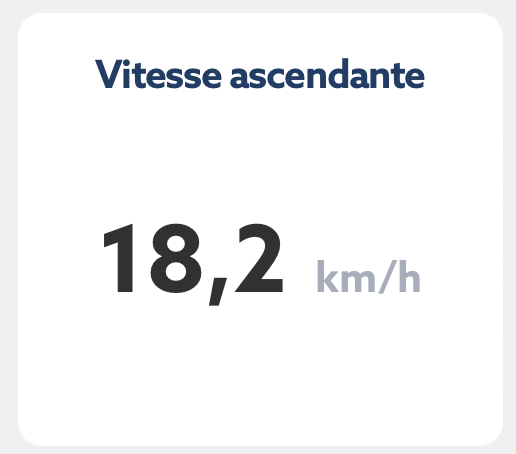
A low speed may indicate a horse that's holding back a littleHe loses the power he has built up during the first phase. This type of horse then needs much more power than another to clear the obstacle, and will tire more quickly. On the other hand speed may reflect a horse that rushes into the jump and doesn't take the time to articulate properly. Mechanized lines without rider intervention will help correct this problem.
Analysis of the jump also involves studying the approach to it, in particular the cadence and its variation. Locomotion data (excluding jumping) indicate the horse's average canter cadence over the session (generally between between 90 and 110 strides/min). To find out more about the cadence measured by Seaver, read the associated article.
For each jump, the cadence is calculated for the last 5 strides before the jump. Its value should not be too different from the value on the flat at the end of the relaxation, or between obstacles. Working at home or with a coach, you can quantify the ideal "show gallop" for jumping. This is calculated according to the level of the tests and the horse's locomotion.
Ideally, and barring any special exercises we should find roughly the same cadence values at the start on all jumps, whether isolated or in combination. Of course, this won't be the case if you're working on a barrage (with higher cadences) or, on the contrary, on gymnastics and relaxation on small obstacles (with lower cadences).
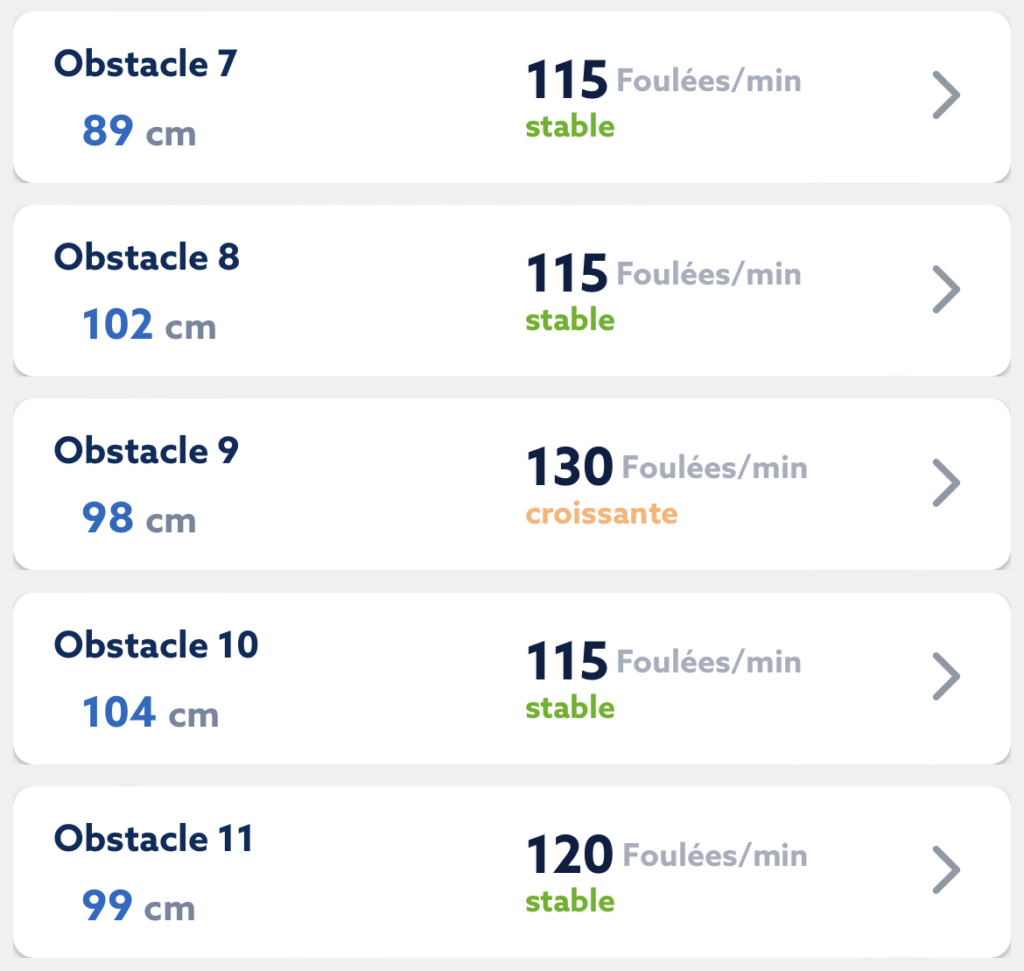
In general, when approaching an obstacle, we try to maintain a stable cadence.(Note that we're talking about stride frequency here, not stride amplitude). That's why a small indicator tells you whether the cadence over the last 5 strides before the jump is increasing, stable or decreasing. It's not necessarily harmful not to have a stable cadence, if that's what you're aiming for; but you absolutely must be aware of it.
In a hunter-type round, we always tend to look for a stable cadence. A decreasing cadence may indicate a horse (or rider) who is falling asleep in his approach.. It may also indicate that he's looking at and backing away from the bar. An increasing cadence is more likely to be seen in a horse that is rushing, often to the detriment of the rider.often to the detriment of longitudinal balance.
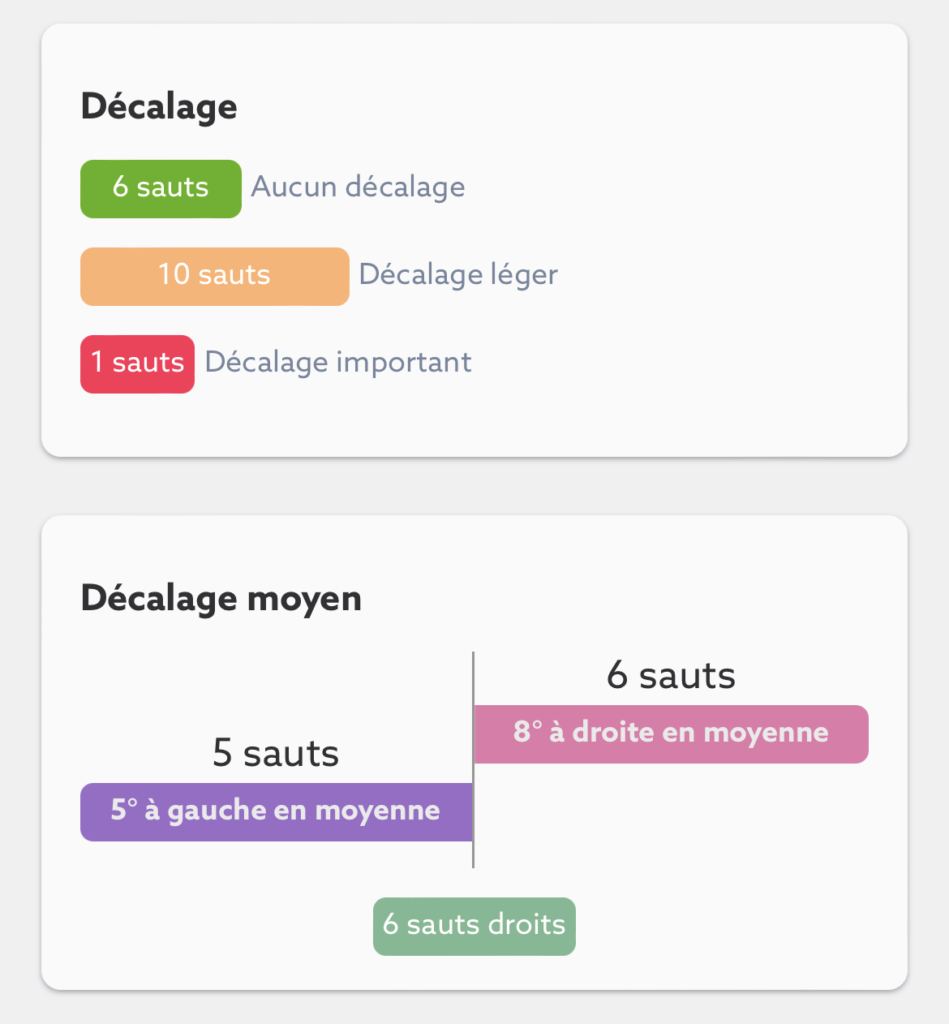
Finally, for each jump: the offset is data collected by the application. This is the change in orientation of the horse's body between the call of the forelegs and the reception of the hindlegsmeasured in degrees (°). Between 0° and 1°, the horse is considered not to have shifted: it remains perfectly straight. Below 10°, it's a slight shift. Beyond that, the shift is considered significant. Always try to reduce the offset as much as possible. The more a horse shifts, the greater the risk of touching the bar as it twists. What's more, in a line or combination, it's very complicated to respect a precise contract with a horse that shifts.
The origins of this phenomenon can be multiple: an asymmetrical push from the horse due to pain, a well-established habit, a rider who is himself asymmetrical in his position or in his requests (hands, legs...). (In all cases, allowing the horse to shift or twist will encourage it to continue. Once the physical causes have been ruled out, working with blocks or triangle bars can help straighten the jump. Appropriate work on the rider's physical preparation to re-lateralize it will also be beneficial.
You can have a perfectly flat jump trajectory (0°) by jumping completely to the right, if you stay on the same line. Likewise, a slant, even at 45° to the front of the obstacle, does not induce an offset. In fact, the horse must maintain the same orientation before, during and after the jump.
Since the sensor doesn't know where the obstacle is, it can't measure whether it's crossed perpendicularly and in the middle. As with many indicators, one-off data (on a jump) is interesting. But it is above all the average over the session that is relevant. If a horse shifts once to the right, even strongly, we can assume it's an incident. On the other hand, if a horse systematically shifts to the same side, we can think of a physical or technical problem, on the part of the horse or rider, which needs to be identified and corrected.
A horse (or pair) can be considered to have a recurring offset problem if, out of 3 successive jumping sessions, there are more than 5 jumps where the offset is significant, or if the average offset to the right or left is greater than 10°. In such cases, the rider is likely to lose lateral control of the horse when approaching the obstacle. We recommend a lot of work on the flat and on ground bars or cavaletti, with the emphasis on keeping the axis.
We can also consider that a problem exists if the horse always shifts to the same side. Even slightly (over 70% of jumps shifted to the same side). In this case, we need to look at the rider's aids (seat, hands, legs) and check that it's not the rider who's inducing the shift. A physical problem can also lead to this type of behavior.
Mastering all these indicators allows you to better analyze your session, jump by jump and on average. This takes into account theeffort provided by the horse and errors or technical successes achieved. This makes it possible to adapt the training program to best suit progress while health capital. In addition to absolute point values, changes between sessions and comparisons between horses or riders on the same exercise are very interesting avenues to explore.
And if you’d like to improve your jumping technique, check out this first video from the “A Responsive and Maneuverable Horse” program by our partner rider Edward Levy!
See you soon for a new article,
The Seaver team 🙂